
The first part of this blog post series described the preparation of the cloud environment. This included an Ubuntu compute instance, representing a router. In the second part, we installed and configured a WireGuard based VPN on the cloud compute instance aka. router. Following, in the third part we configured the home router and established the VPN connection.
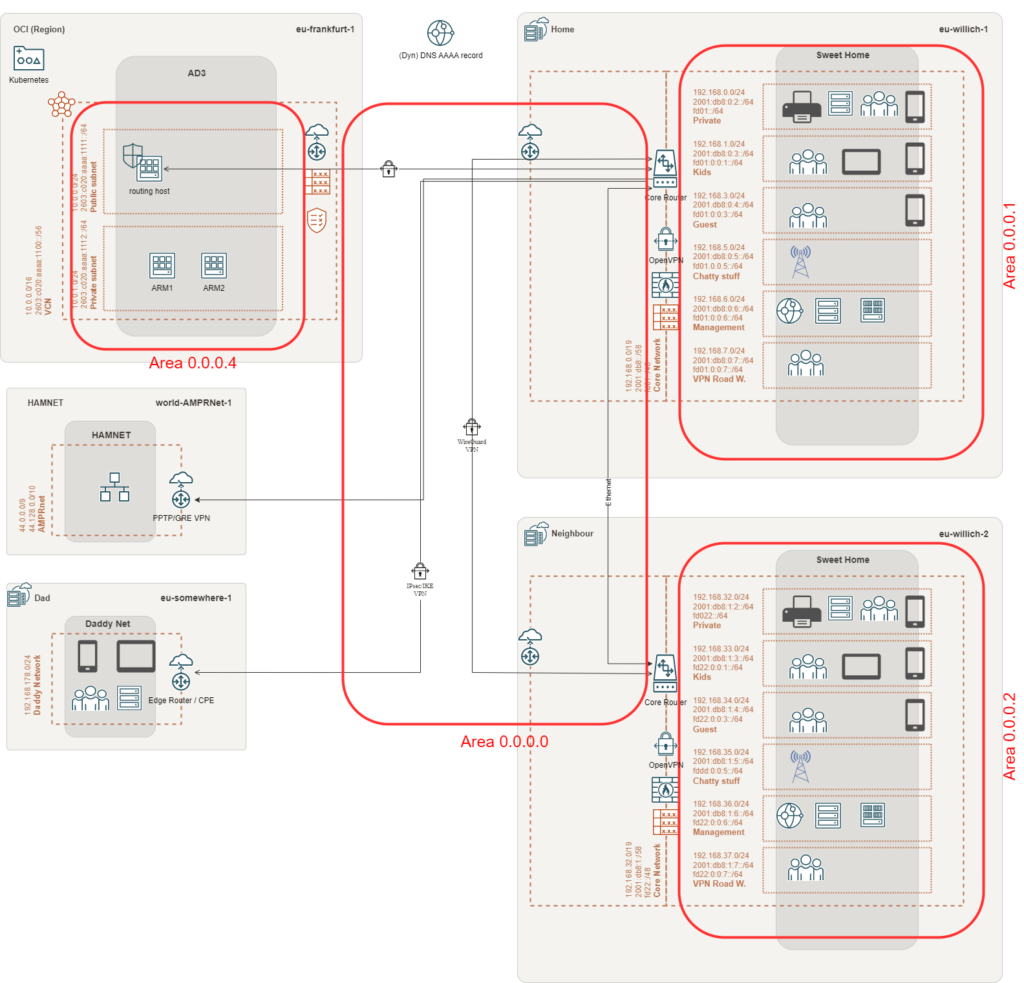
Now we’ll take care of the routing and the routing protocol OSPF. OSPF is an interior gateway protocol and will help use to manage the routing over the networks. With multiple routers involved, management becomes more complex and will implement a risk of failure. A gateway protocol will help us to mitigate the risk of configuration failures and reduce the configuration effort.
Quagga
Probably, you did read my other blog post: Delete IPv6 route on EdgeRouter™-X? If you did read the post, you might be aware that the Ubiquiti EdgeRouter™-X is making use of the Quagga Routing Suite. The name Routing Suite will already imply it, we need to install the software on the OCI compute instance to receive OSPF support and routing capabilities – assuming that Quagga Routing Suite might work best with the Quagga based EdgeRouter™-X implementation.
Well, maybe! But later…
Update: Meanwhile, the Quagga project is considered to be deprecated.
Please continue with the FRRouting fork.
Install Quagga
Set kernel parameter
To enable the routing capabilities on the OCI compute instance, several kernel parameter need to be modified:
#/etc/sysctl.conf
#Enable IPv4 and IPv6 Unicast Forwarding:
net.ipv4.ip_forward = 1
net.ipv6.conf.all.forwarding = 1
Enable new parameters with:
sudo sysctl -p
There might be other kernel parameters worth paying attention. E.g:
net.ipv4.conf.all.rp_filter
net.ipv4.conf.all.send_redirects
net.ipv4.conf.all.accept_source_route
net.ipv6.conf.all.accept_source_route
net.ipv4.conf.all.log_martians
net.ipv4.conf.all.proxy_arp
net.ipv6.conf.all.proxy_ndp
Here is a good summary of the kernel parameter available:
Get the Quagga package
root@oci:~#apt-get update & apt-get upgrade
...
root@oci:~# apt-get install quagga
Reading package lists... Done
Building dependency tree
Reading state information... Done
The following additional packages will be installed:
  quagga-bgpd quagga-core quagga-isisd quagga-ospf6d quagga-ospfd quagga-pimd quagga-ripd quagga-ripngd
Suggested packages:
  snmpd
The following NEW packages will be installed:
  quagga quagga-bgpd quagga-core quagga-isisd quagga-ospf6d quagga-ospfd quagga-pimd quagga-ripd quagga-ripngd
0 upgraded, 9 newly installed, 0 to remove and 0 not upgraded.
Need to get 1276 kB of archives.
After this operation, 5716 kB of additional disk space will be used.
Do you want to continue? [Y/n] y
The documentation can be installed with:
root@oci:~# apt-get install quagga-doc
Reading package lists... Done
Building dependency tree
Reading state information... Done
The following NEW packages will be installed:
  quagga-doc
0 upgraded, 1 newly installed, 0 to remove and 0 not upgraded.
Need to get 865 kB of archives.
After this operation, 926 kB of additional disk space will be used.
Get:1 http://eu-frankfurt-1-ad-3.clouds.archive.ubuntu.com/ubuntu focal/main amd64 quagga-doc all 1.2.4-4build1 [865 kB]
Fetched 865 kB in 1s (855 kB/s)
Selecting previously unselected package quagga-doc.
(Reading database ... 129875 files and directories currently installed.)
Preparing to unpack .../quagga-doc_1.2.4-4build1_all.deb ...
Unpacking quagga-doc (1.2.4-4build1) ...
Setting up quagga-doc (1.2.4-4build1) ...
Review Quagga services
To configure Quagga, you may connect via telnet to the following ports:
Quagga (http://www.quagga.net)
root@oci:~# cat /etc/services  | grep zebra
zebrasrv        2600/tcp                        # zebra service
zebra           2601/tcp                        # zebra vty
ripd            2602/tcp                        # ripd vty (zebra)
ripngd          2603/tcp                        # ripngd vty (zebra)
ospfd           2604/tcp                        # ospfd vty (zebra)
bgpd            2605/tcp                        # bgpd vty (zebra)
ospf6d          2606/tcp                        # ospf6d vty (zebra)
isisd           2608/tcp                        # ISISd vty (zebra)
Update firewall
The standard Oracle Cloud based Ubuntu image will make use of preconfigured firewall rules. They need to be amended.
Review current active rules with:
root@oci:~# iptables -L -n -v
root@oci:~# ip6tables -L -n -v
Mostly, the rules are stored in:
/etc/iptables/rules.v4
/etc/iptables/rules.v6
Be aware that OSPF is a protocol, please! To clarify, there’s no tcp or udp port to configure in your firewall configuration. It’ll be a protocol with the protocol number 89. E.g.:
IPv4
#allow OSPF, just an example
root@oci:~# iptables -A INPUT --protocol OSPF -j ACCEPT
root@oci:~# iptables -L -v -n
chain INPUT (policy ACCEPT 342 packets, 24562 bytes)
 pkts bytes target     prot opt in     out     source               destination
    1    84 ACCEPT     89   --  *      *       0.0.0.0/0            0.0.0.0/0
...
root@oci:~# iptables -A OUTPUT --protocol OSPF -j ACCEPT
root@oci:~# iptables -A FORWARD --protocol OSPF -j ACCEPT
IPv6
#allow OSPFv3, just an example
root@oci:~# ip6tables -A INPUT --protocol OSPF -j ACCEPT
root@oci:~# ip6tables -L -v -n
Chain INPUT (policy ACCEPT 1120 packets, 184K bytes)
 pkts bytes target     prot opt in     out     source               destination
   25  1900 ACCEPT     89       *      *       ::/0                 ::/0

root@oci:~# iptables -A OUTPUT --protocol OSPF -j ACCEPT
root@oci:~# iptables -A FORWARD --protocol OSPF -j ACCEPT
Copy default configuration files
Unfortunately, there’s an issue with the current Quagga Ubuntu package. Therefore, I copied the sample files from another Debian host to the /usr/share/doc/quagga-core/examples/ folder.
The normal procedure will be to copy the example files from /usr/share/doc/quagga-core/examples/ to /etc/quagga.
root@oci:~# cp /usr/share/doc/quagga-core/examples/ospf6d.conf.sample /etc/quagga/ospf6d.conf
root@oci:~# cp /usr/share/doc/quagga-core/examples/ospfd.conf.sample /etc/quagga/ospfd.conf
root@oci:~# cp /usr/share/doc/quagga-core/examples/vtysh.conf.sample /etc/quagga/vtysh.conf
root@oci:~# cp /usr/share/doc/quagga-core/examples/zebra.conf.sample /etc/quagga/zebra.conf
There’re more example files available. This example is limited to the minimum required configuration files.
Change the owner and access mode of the configuration files:
root@oci:~# chown quagga:quagga /etc/quagga/*.conf
root@oci:~# chown quagga:quaggavty /etc/quagga/vtysh.conf
root@oci:~# chmod 640 /etc/quagga/*.conf
Prepare logging
root@oci:~# mkdir /var/log/quagga/
root@oci:~# touch /var/log/quagga/zebra.log
root@oci:~# touch /var/log/quagga/ospfd.log
root@oci:~# touch /var/log/quagga/ospf6d.log
root@oci:~# chown quagga:quagga -R /var/log/quagga/
root@oci:~# chmod 640 /var/log/quagga/*.log
Configure Quagga
There’re multiple ways to configure Quagga. If you are familiar with the Cisco configuration terminal, you might want to call the vtysh:
root@oci:~# which vtysh
/usr/bin/vtysh

root@oci:~# vtysh

Hello, this is Quagga (version 1.2.4).
Copyright 1996-2005 Kunihiro Ishiguro, et al.
In the idea of the blog post, I preferer the configuration files.
vtysh.conf
!/etc/quagga /vtysh.conf
! Sample configuration file for vtysh.
!
!service integrated-vtysh-config
hostname <your_oci_router_hostname>
username quagga nopassword
!
Enabling service integrated-vtysh-config will condense the configuration into one file: quagga.conf. I preferer to work with individual configuration files per daemon. In case of a configuration error, the impact is reduced.
zebra.conf
Zebra is the core routing manager and will interact with different routing protocols. Here we’ll cover the interfaces and static routing information.
!/etc/quagga /zebra.conf
!
!
hostname <your_oci_router_hostname>
password Quagga
enable password Quagga
log file /var/log/quagga/zebra.log
log stdout
log syslog
log monitor
!
interface ens3
 link-detect
 ip address 10.0.0.2/24
 ipv6 address 2603:c020:aaaa:1111::aaaa/64
 ipv6 address 2603:c020:aaaa:1111::beee/64
!
interface lo
 link-detect
 ip address 127.0.0.1/8
 ipv6 address ::1/128
!
interface wg0
 link-detect
 ip address 192.168.250.6/30
 ipv6 address fd02:0:0:1::2/64
 ipv6 address fe80::6/64
!
ipv6 route 2603:c020:aaaa:1100::/56 fe80::xxxx:xxxx:xxxx ens3
ipv6 route fdxx:xxxx:xxxx:xxxx::/56 fdxx:xxxx:xxxx:xxxx::1 wg0
ipv6 route fdxx:xxxx:xxxx::/64 fdxx:xxxx:xxxx:xxxx::1 wg0
ipv6 route fdxx:xxxx:xxxx::/48 fdxx:xxxx:xxxx:xxxx::1 wg0
!
ip forwarding
ipv6 forwarding
!
!
line vty
!
There’re some issues with the OSPFv3 EdgeRouter™-X implementation. Static IPv6 routes are for fallback. Maybe you don’t need them.
ospfd.conf
This is the IPv4 based OSPF configuration:
!/etc/quagga /ospfd.conf
!
!
hostname ospfd
password zebra
!
!logging
log file /var/log/quagga/ospfd.log
log stdout
log syslog
log monitor
!
interface ens3
 ip ospf authentication message-digest
 ip ospf message-digest-key 1 md5 <password>
!
interface lo
!
interface wg0
 ip ospf authentication message-digest
 ip ospf message-digest-key 1 md5 <password>
!
router ospf
 ospf router-id 192.168.250.6
 redistribute connected
 network 10.0.0.0/16 area 0.0.0.4
 network 192.168.250.4/30 area 0.0.0.0
 area 0.0.0.0 authentication message-digest
 area 0.0.0.4 authentication message-digest
 area 0.0.0.4 stub
!
line vty
ospf6d.conf (draft)
This is the IPv6 based OSPFv3 configuration
!/etc/quagga /ospf6d.conf
!
!
hostname ospf6d
password Quagga
log file /var/log/quagga/ospf6d.log
log stdout
log syslog
log monitor
!
debug ospf6 lsa unknown
debug ospf6 neighbor state
!
interface lo
 ipv6 ospf6 cost 1
 ipv6 ospf6 network point-to-point
!
interface ens3
 ipv6 ospf6 cost 1
 ipv6 ospf6 network point-to-point
!
interface wg0
 ipv6 ospf6 cost 1
 ipv6 ospf6 network point-to-point
!
!
router ospf6
 router-id 192.168.250.6
 log-adjacency-changes
 redistribute connected
 area 0.0.0.0 range fd02::/48
 area 0.0.0.4 range 2603:c020:aaaa:1100::/56
 !interface lo area 0.0.0.0
 interface wg0 area 0.0.0.0
 interface ens3 area 0.0.0.4
!
line vty
!
https://www.quagga.net/docs/quagga.html#OSPFv3
As mentioned, with the EdgeRouter-X there’s currently an issues with the OSPFv3 implementation and Wireguard. This part will be updated, once I mange to get it working. Meanwhile, make use of the static IPv6 routes, as a fallback.
Manage daemons
Once the configuration has been finalized, you may enable and start the daemons:
Enable Quagga daemons
root@oci:~# systemctl is-enabled zebra
root@oci:~# systemctl is-enabled ospfd
root@oci:~# systemctl is-enabled opsf6d
Prevent a daemon from running
All protocols, we don’t make use of, should be disabled:
root@oci:~# systemctl disable bgpd
root@oci:~# systemctl disable isisd
root@oci:~# systemctl disable ripd
root@oci:~# systemctl disable ripngd
root@oci:~# systemctl disable pimd
Restart a daemon to run
After a configuration change in the config files, you may restart daemons like this:
root@oci:~# sudo systemctl restart zebra
root@oci:~# sudo systemctl restart ospf6d
root@oci:~# sudo systemctl restart ospfd
EdgeRouter
Now we need to setup the home router and the OSPF configuration. Just as a reminder, in my case this will be an EdgeRouter™-X.
Login via SSH and execute the following commands:
OSPF
configure

set protocols ospf parameters abr-type cisco
set protocols ospf parameters router-id 1.1.1.1
set protocols ospf passive-interface default
set protocols ospf passive-interface-exclude wg0

set protocols ospf area 0 area-type normal
set protocols ospf area 0 network 192.168.250.4/30

#local area of your private network
set protocols ospf area 1 area-type stub
set protocols ospf area 1 network 192.168.0.0/19
set protocols ospf redistribute connected metric-type 1
#set protocols ospf redistribute static metric-type 1

set interfaces wireguard wg0 ip ospf authentication md5 key-id 1 md5-key <password>
set interfaces wireguard wg0 ip ospf dead-interval 40
set interfaces wireguard wg0 ip ospf hello-interval 10
set interfaces wireguard wg0 ip ospf priority 1
set interfaces wireguard wg0 ip ospf retransmit-interval 5
set interfaces wireguard wg0 ip ospf transmit-delay 1
commit
save
OSPFv3 (IPv6) – draft
configure

set protocols ospfv3 area 0.0.0.0 area-type normal
set protocols ospfv3 area 0.0.0.0 interface lo
set protocols ospfv3 area 0.0.0.0 interface wg0
set protocols ospfv3 area 0.0.0.0 range 'fd02::/48'

set protocols ospfv3 area 0.0.0.1 area-type stub
set protocols ospfv3 area 0.0.0.1 interface eth0
set protocols ospfv3 area 0.0.0.1 interface eth0.20
set protocols ospfv3 area 0.0.0.1 interface vtun0
set protocols ospfv3 area 0.0.0.1 range 'fd01::/56'
set protocols ospfv3 parameters abr-type cisco
set protocols ospfv3 parameters router-id 1.1.1.1
set protocols ospfv3 passive-interface default
set protocols ospfv3 passive-interface-exclude wg0
set protocols ospfv3 redistribute connected

set interfaces wireguard wg0 ipv6 ospfv3 cost 1
set interfaces wireguard wg0 ipv6 ospfv3 dead-interval 40
set interfaces wireguard wg0 ipv6 ospfv3 hello-interval 10
set interfaces wireguard wg0 ipv6 ospfv3 instance-id 0
set interfaces wireguard wg0 ipv6 ospfv3 priority 1
set interfaces wireguard wg0 ipv6 ospfv3 retransmit-interval 5
set interfaces wireguard wg0 ipv6 ospfv3 transmit-delay 1
Send IPv6 traffic trough the VPN
As you might be aware of, within the Oracle Cloud it’s not feasible to make use of IPv6 ULA addresses. What will raise the question, how will it be possible to send IPv6 traffic through the VPN connection?
I helped myself with a special trick:
Update: Meanwhile, IPv6 ULA address support has been released. So, I recommend making use of ULA addresses, in addition to your GUA addresses in OCI. Do not forget to randomise your ULA e.g., with the help of RFC4193 IPv6 Generator (cd34.com)
Static route to OCI
On my edge router, Eth2 is pointing to the default gateway and public internet. In consequence, I established a static route to the OCI router address 2603:c020:aaaa:1111::aaaa. This will give me the chance to reach the VPN endpoint in the OCI and finally to establish the VPN tunnel.
set protocols static route6 '2603:c020:aaaa:1111::aaaa/128' next-hop 'fe80::5' distance 1
set protocols static route6 '2603:c020:aaaa:1111::aaaa/128' next-hop 'fe80::5' interface eth2
To make sure that all traffic witch is relate to the Oracle Cloud VPC will travel via the Wiregaurd VPN, I send defined the following static route:
set protocols static route6 '2603:c020:aaaa:1100::/56' next-hop 'fd02:0:0:1::2' distance 10
set protocols static route6 '2603:c020:aaaa:1100::/56' next-hop 'fd02:0:0:1::2' interface wg2
Well, but how may you reach the OCI routing host using the VPN? Valide quest! Do you remember? There’s this secondary IP address on ens3 2603:c020:aaaa:1111::beee.
Validate
To validate the routing, execute the following (home to oci):
ip route get 2603:c020:aaaa:1111::aaaa
2603:c020:aaaa:1111::aaaa from :: via fe80::1234 dev eth2 proto zebra src 2a00:xxxx:xxxx:xxxx:xxxx:xxx:xxxx:4567 metric 1024 pref medium
Voilà, OCI VPN endpoint is reachable via eth2.
And all other adresses of the OCI IPv6 VPC range are reachable via wg0
 ip route get 2603:c020:aaaa:1111::beee
2603:c020:aaaa:1111::beee from :: via fd02:0:0:1::2 dev wg2 proto zebra src fd02:0:0:1::1 metric 1024 pref medium
And the other way round (oci to home):
ip route get 2a00:xxxx:xxxx:xxxx:xxxx:xxx:xxxx:4567
2a00:xxxx:xxxx:xxxx:xxxx:xxx:xxxx:4567 from :: via fe80::6 dev ens3 proto ra src 2603:xxxx:xxxx:xxxx::aaaa metric 100 pref medium

ip route get fd02:0:0:1::1
fd02:0:0:1::1 from :: dev wg0 proto kernel src fd02:0:0:1::2 metric 256 pref medium
The big final
If there’s no configuration mistake, everything should be ready. Let’s start all related daemons on the OCI routing host:
sudo systemctl restart zebra
sudo systemctl restart ospf6d
sudo systemctl restart ospfd
Once started, validate the routing with:
OCI
sudo vtysh

Hello, this is Quagga (version 1.2.4).
Copyright 1996-2005 Kunihiro Ishiguro, et al.

oci# show ip ospf neighbor

Neighbor ID     Pri State           Dead Time Address         Interface            RXmtL RqstL DBsmL
1.1.1.1           1 Full/DROther      35.914s 192.168.250.5   wg0:192.168.250.6       0     0     0
It’s looking good! We do have a neigborship established.
Check if routes are propagated via OSPF:
oci# show ip route
O>* 192.168.0.0/24 [110/11] via 192.168.250.5, wg0, 1d22h17m…
O>* 192.168.1.0/24 [110/11] via 192.168.250.5, wg0, 1d22h17m
O>* 192.168.2.0/24 [110/11] via 192.168.250.5, wg0, 1d22h17m
O>* 192.168.3.0/24 [110/11] via 192.168.250.5, wg0, 1d22h17m
O>* 192.168.4.0/24 [110/11] via 192.168.250.5, wg0, 1d22h17m
...


show ip ospf route
============ OSPF network routing table ============
N IA 192.168.0.0/24           [21] area: 0.0.0.0
                           via 192.168.250.5, wg0
N    10.0.0.0/24           [10] area: 0.0.0.4
                           directly attached to ens3
...
EdgeRouter@home
show ip ospf neighbor

Total number of full neighbors: 1
OSPF process 0 VRF(default):
Neighbor ID     Pri   State            Dead Time   Address         Interface             Instance ID
192.168.250.6    1   Full/ -          00:00:32    192.168.250.6    wg0                   0
Yeah! IPv4 is propagated via OSPF!
oci# show ipv6 ospf neighbor
Neighbor ID     Pri    DeadTime  State/IfState         Duration I/F[State]
1.1.1.1           1    00:00:34   Init/PointToPoint  5d00:22:23 wg0[PointToPoint]
And as mentioned, I am currently not able to setup a neighbour ship over OSPFv3. During my research I could read some posts about an issue with the implementation. My support request has been closed with the comment that WireGuard is community driven and is not supported from the vendor.
I’ll keep you posted!
- Setup a WireGuard VPN using IPv6 and OSPF – Oracle Cloud Free Tier- part I
- Prepare Oracle Cloud – Free Tier
- Setup a WireGuard VPN using IPv6 and OSPF – Oracle Cloud Free Tier- part II
- Configure WireGuard on the routing host in the Oracle Cloud
- Setup a WireGuard VPN using IPv6 and OSPF – Oracle Cloud Free Tier- part III
- Configure your router @home
- Setup a WireGuard VPN using IPv6 and OSPF – Oracle Cloud Free Tier- part IV
- Configure OSPF/routing