Part II
The first part of this blog post series described the preparation of the cloud environment. This included an Ubuntu compute instance. Following part I, in part II we will continue to prepare the compute instance and install WireGuard on our routing host.
The installation itself is straightforward and well documented. E.g. an installation document from Oracle is available. But our intention is to install OSPF, in addition. Therefore, we need to do this in a slightly different way.
Prerequisites
- ssh access
- sudo/root privileges
- installed and configured apt-get
- comfortable with Linux administration tasks
- your preferred terminal tool e.g. putty
- dynamic IPv6 DNS address of your home router
Prepare kernel settings
Login to the routing host and execute the following as root user (sudo):
Add the following parameter in sysctl.conf
#/etc/sysctl.conf

net.ipv4.ip_forward=1

net.ipv6.conf.all.forwarding=1
Enable sysctl.conf parameter
sysctl -p

net.ipv4.ip_forward = 1

net.ipv6.conf.all.forwarding = 1
Install WireGuard
Get and install the WireGuard package
apt-get install wireguard

Reading package lists... Done

Building dependency tree

Reading state information... Done

The following additional packages will be installed:

  wireguard-tools

Suggested packages:

  openresolv | resolvconf

The following NEW packages will be installed:

  wireguard wireguard-tools

0 upgraded, 2 newly installed, 0 to remove and 0 not upgraded.

Need to get 86.6 kB of archives.

After this operation, 344 kB of additional disk space will be used.

Do you want to continue? [Y/n]

...
Validate module is loaded
modinfo wireguard
filename:       /lib/modules/5.11.0-1028-oracle/kernel/drivers/net/wireguard/wireguard.ko
alias:          net-pf-16-proto-16-family-wireguard
alias:          rtnl-link-wireguard
version:        1.0.0
...
Generate encryption keys
cd /etc/wireguard
umask 077
wg genkey | tee privatekey | wg pubkey > publickey
Prepare systemd-netword
WireGuard provides wg-quick to setup a VPN connection. Unfortunately, this can’t be used, because wg-quick will change routing entries on the host. This must not happen! In our case, routing management is the duty of OSPF. Therefore, systemd-networkd is the preferred way to setup the WireGuard VPN connection.
Don’t use:
wg-quick!
netdev
Create the Virtual Network Device file netdev definition in /etc/systemd/network/
# /etc/systemd/network/50-wireguard.netdev
[NetDev]
Name = wg0
Kind = wireguard
Description = WireGuard VPN to MYSWEETHOME
[WireGuard]
ListenPort = 51822
PrivateKey = <your private key>
[WireGuardPeer]
PublicKey = <public key - of the other side>
AllowedIPs = 0.0.0.0/0, ::0/0
Endpoint = foobar.dyn.foobar.com:51822 <dynamic DNS of MYSWEETHOME (ipv6 only AAAA record)>
PersistentKeepalive = 25
network
Create the network interface configuration file in /etc/systemd/network/
# /etc/systemd/network/50-wireguard.network
[Match]
Name = wg0

[Network]
Address = fd02:0:0:1::2/64 <IPv6 ULA transport network address>
Address = 192.168.250.6/30 <IPv4 transport network address>
Address = fe80::6/64 <link-local>
Set privileges
chgrp systemd-network 50-*
chmod 640 50-*
Network Security Groups
Create a Network Security Group
With the help of Network Security Groups, we may control the traffic of the routing host in the Oracle Cloud. We need to allow the WireGuard ingress traffic to establish the VPN connection.
Network Security Groups can be configured in the Virtual Cloud Networks Details.


Attach Networks Security Group to host
Go to “Instance details” and chose the “Edit” link in the “Instance information” tab.

Security List
Opposite to a Network Security Group, that is assigned to a host, a Security List will take care of a complete network segment or Virtual Cloud Network – VCN.
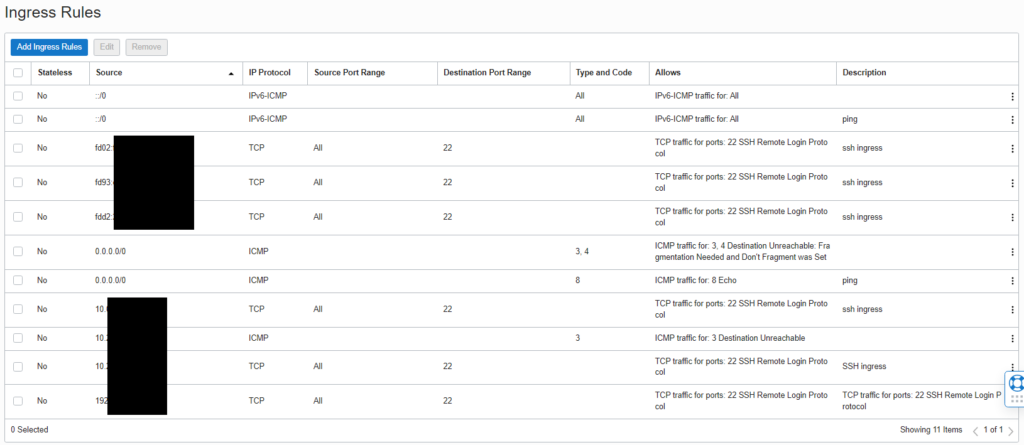
Please make sure to take care of a Security List, as well. Allowing ICMP ping between networks, might help to troubleshoot configuration issues. Security Lists and Network Security Groups can be combined.
A basic example for your inspiration:

Default Route Table
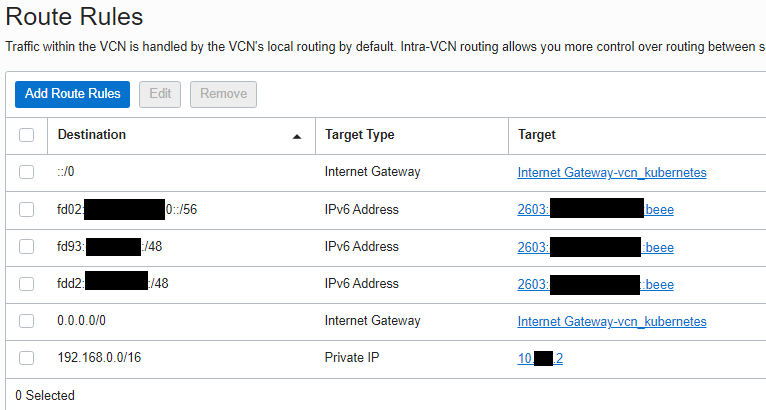
To provide the new routing host as a gateway to your home network, you need to make other hosts in the Oracle Cloud aware about this. This can be archive with the help of the Default Route Table.
Go to “Virtual Cloud Networks” in “Networking” to edit the “Route Table Details”

It’s quite important to understand., that your routing host will be the target/gateway to reach your home network. Therefore, it’s required to declare all network segments of your home network.
I do make use of IPv6 prefix delegation, because I do receive my public IPv6 addresses and segments from my ISP. Unfortunately, they’re floating. To deal with the resulting issues, I implemented private ULA addresses of the fd00::/8 range, to archive an reliable internal network structure. I recommend to do the same, if you don’t have static IPv6 segments in your network.
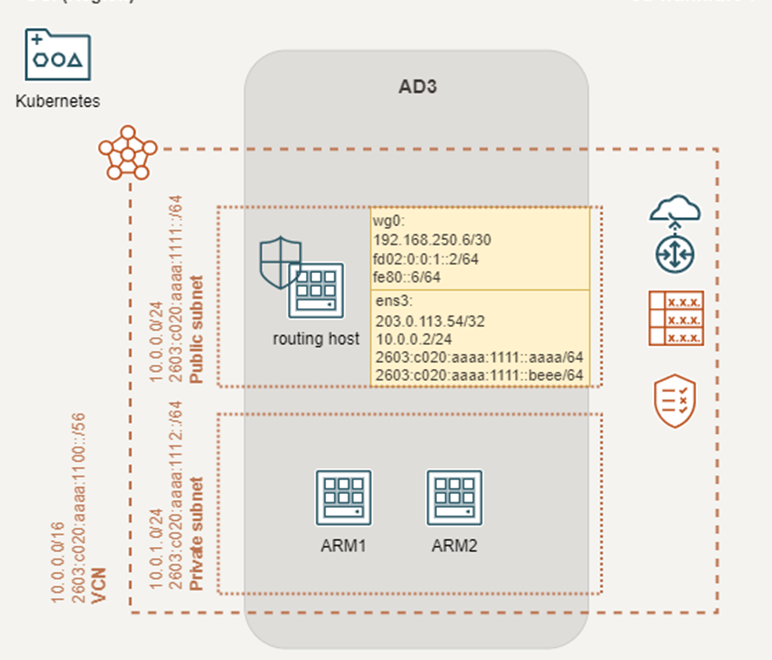
Unfortunately, I couldn’t manage to assign ULA addresses to the compute instances in the Oracle Cloud. To overcome some routing difficulties, in part I I attached two IPv6 GUA addresses to the routing host. One is considered for the VPN link over public Internet (::aaaa). The other is used for traffic through the VPN tunnel (::beee). Some more details will be demonstrated in part III of the blog post.
Start systemd-networkd
We reached the end of part II!
Let’s start the WireGuard interface:
systemctl start systemd-networkd
systemctl enable systemd-networkd
systemctl restart systemd-networkd
systemctl status systemd-networkd
ip a
3: wg0: <POINTOPOINT,NOARP,UP,LOWER_UP> mtu 1420 qdisc noqueue state UNKNOWN group default qlen 1000
    link/none
    inet 192.168.250.6/30 brd 192.168.250.7 scope global wg0
       valid_lft forever preferred_lft forever
    inet6 fd02:0:0:1::2/64 scope global
       valid_lft forever preferred_lft forever
    inet6 fe80::6/64 scope link
       valid_lft forever preferred_lft forever
and check WireGuard
wg
interface: wg0
  public key: xxxxxxxxxxxxxxxxxxxxxxxxxxxxxxxx
  private key: (hidden)
  listening port: 51822

peer: xxxxxxxxxxxxxxxxxxxxxxxxxxxxxxxxxxxxxxxxxxxxxxxxxxxxx
  endpoint: [2a00:xxxx:xxxx:xxxx:xxxx:xxxx:xxxx:xxxx]:51822
  allowed ips: ::/0, 0.0.0.0/0
  transfer: 0 B received, 33.68 KiB sent
  persistent keepalive: every 25 seconds
OCI ready?!

What next?
The WireGuard interface is up and running!
But unfortunately, we did not configure the home router so far.
This will be discussed in part III of this blog post.
- Setup a WireGuard VPN using IPv6 and OSPF – Oracle Cloud Free Tier- part I
- Prepare Oracle Cloud – Free Tier
- Setup a WireGuard VPN using IPv6 and OSPF – Oracle Cloud Free Tier- part II
- Configure WireGuard on the routing host in the Oracle Cloud
- Setup a WireGuard VPN using IPv6 and OSPF – Oracle Cloud Free Tier- part III
- Configure your router @home
- Setup a WireGuard VPN using IPv6 and OSPF – Oracle Cloud Free Tier- part IV
- Configure OSPF/routing
